Tutorial: Start exploring Moodle
| Site: | Training Site for 6OU |
| Course: | Start Teaching with Moodle |
| Book: | Tutorial: Start exploring Moodle |
| Printed by: | Guest user |
| Date: | Thursday, 22 January 2026, 5:24 PM |
1. Focus for this tutorial
In this tutorial we explore:
- How to find your way around a Moodle site and course;
- What the Dashboard and My courses tab do;
- What a Moodle course is and how to navigate it.
2. Finding your way around
- How you navigate around a site depends on your administrator's settings and your version of Moodle.
- With the latest version of Moodle, using the standard "Boost" theme you will see three links at the top when you first log in.
- Home takes you to the front page;
- Dashboard shows you a timeline of tasks you have to complete, a calendar and items you have recently accessed;
- My courses shows you courses you are enrolled in. If you are not yet enrolled in any courses you won't see anything there.
- A user menu top right when logged in has quick links to useful areas of Moodle. You can edit your profile and preferences from there, view grades, change the language you see instructions in, and more.
- You can access messages and notifications from the icons at the top and do a global search if enabled.
- Once inside a course, you will notice a collapsible Course index on the left which displays course sections and the items within them.
The following video explains how to find your way around a Moodle.
Video Transcript:
Finding your way around:
How you find your way around a Moodle site depends on the administrator settings, the theme or background used and how up to date your version of Moodle is.
This video shows Moodle version 4..
Some Moodle sites have attractive front pages;
MoodleCloud sites simply have the login box. Let's log in.
Once logged in, you can edit your profile by clicking top right - for example to add a profile image. You can also access any messages, and set your own message preferences, and notifications and set your notification preferences from the icons.
Often when you log in, you're directed to a personal page called your dashboard.Your admin might have set a different first page or they might let you specify your own choice of page from your preferences.
From the dashboard you l see a timeline of any deadlines due from courses that you're enrolled in, along with a calendar and from the expandable block drawer on the right, a block showing you course items you last accessed.
Our Moodle user Sam doesn’t yet have any activities in her timeline so let’s go to another site and look at student Paula.
In her timeline she can view activities by due date or by date or activity type or name; she can quickly see what is overdue and what she needs to do to complete activities and from the expandable block drawer the items
she’s recently viewed.
By enabling Edit mode top right our student- and any Moodle user - can add extra blocks if desired.
And blocks may be moved from the side into the central area and up and down there.
Also at the top of the screen is a link Home. back to the site front page and My Courses.
Clicking here takes you to the courses you are enrolled in, either as a student, as here or as a teacher.
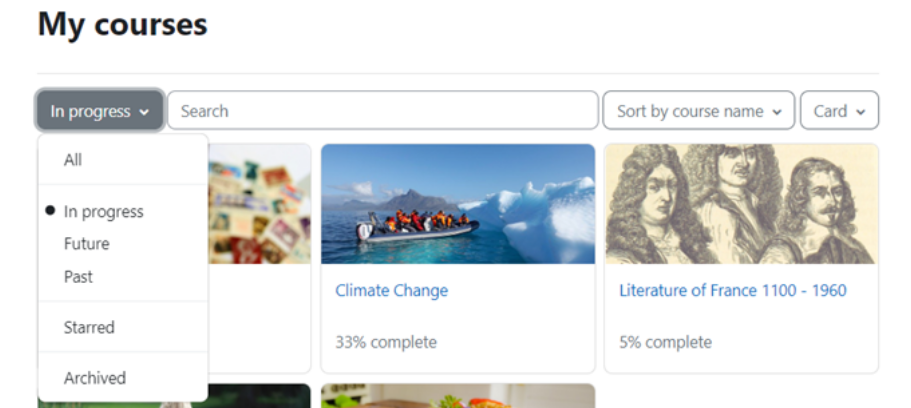
You can see all courses, those in progress, future or past and starred courses are ones bookmarked or favourited.
You can sort by course name or last accessed and courses can display in list view, summary view or, as here card view.
If we click into a course as student Paula, we can access useful links from the question mark icon bottom right, which also shows a link to site support.
The course index on the left can be collapsed to free up more space.
It scrolls independently of the central area and activity completion indicators display at a glance what our student has completed and has still to do. If she clicks on an item in the course index, the activity opens up in the central area.
If blocks have been added to the course, the block drawer can be expanded to access them.
From the central area. Student Paula can access Participants, Grades and Competencies.
Her teacher can also access extra course settings, Reports and from More, some other useful features we explore in other videos.
As you move down the central area, the course index follows the path and highlights the location. Activities and resources are neatly defined within ‘cards’ and the activity completion conditions are now positioned to the right of the item.
Sections may be collapsed and expanded, in the central area and /or from the course index.
3. Dashboard
You can access your personal dashboard at any time by clicking the Dashboard tab at the top of your screen.
The timeline shows which activities you must complete, along with any deadlines. Click the button on the right (showing the task completion requirement) to access the task directly. You can filter and search the timeline.
The Calendar shows events added by the teacher and site admin as well as any reminder you want to set for yourself.
If you click the arrow top right ('Open block drawer') it will show the course item you most recently accessed, so you can return there if you want.
4. Quick check
Test your understanding with this quick check. The grades are not stored, so you can try as often as you like.
5. What is a course?
- A 'course' can be a simple page with documents for one teacher and one class, or a complex page with many different activities shared by teachers and several classes.
- It can be always available or have start and end dates, and learners can access it in a number of ways, such as enrolling themselves, being enrolled by their teacher, or by the Moodle administrator.
- A course can display its materials in a number of ways or 'formats', for example in weekly sections or (named) topic sections. You can show all the sections at once or just reveal one at a time.
- You can also add elements known as 'blocks' to the right of the course central area to display more useful information.
The following video explains what a course is.
Video Transcript
What is a course?
A course in Moodle is basically a space on the Moodle site where one or more teachers can add learning resources and activities for their students.
What your course might look like as a teacher will depend partly on the chosen theme and settings of your administrator.
In the latest version of Moodle with the latest Boost theme you can expect to see a collapsible course index on the left with links to the course sections and any activities, and an expandable block drawer on the right which may have extra information or resources in blocks.
The main content area here is where the actual teaching and learning resources will be added.
In Sam's practice course they are numbered topics which can be renamed, but if we look at a different course on a different Moodle site you can see that these are divided into weekly sections and there are some blocks on the right.
In another video we will look at the use of these blocks.
In order to add learning resources, you need to have editing enabled and on and you do this by toggling the edit icon top right.
There is an Announcements forum here and if I wish to move it into a different section, I simply drag and drop..
If you aren't able to move by dragging and dropping, then ask your administrator for advice.
In order to add files documents or activities for your students, you need to click the link
Add an activity or resource in the section where you'd like them to appear.
It doesn't matter if you choose the wrong section by mistake because it's always possible to move them afterwards.
When you click Add an activity or resource, this displays Moodle's Activity chooser which then allows you to choose what you would like to add, and we'll look at this in a separate video.
6. My courses
The My courses tab is where you can see courses you are enrolled in. You can view them all, or filter courses that are in progress, completed or yet to begin. You can favourite (or 'star') courses and hide (or 'archive' ) courses that you no longer want to display.
You can search for your courses and display them as cards or as a list.
The percentage you see is a mark of how much of that course you have completed. It might not show on all courses, if a course has no required items.
7. Add and edit text
- Atto is Moodle's purpose-built editor for adding text, images and media. It has improved accessiblity, with a screenreader and accessibility checker.
- You can drag and drop images directly into the text box and make links.
- If you use H5P interactive content, you can display it in the Atto editor.
- Content you add to the Atto editor is saved automatically at regular intervals, so you don't have to worry about losing it.
- The media and recording icons offer many options when adding or recording audio and video.
- If your admin allows, you can change your editor (to TinyMCE or plain text) from the user menu top right, Preferences and then Editor Preferences.
The following video explains how to add and edit text with the Atto editor.
Video Transcript
Add and edit text
In many places in Moodle where you can type in text you will see Moodle's purpose built editor known as Atto.
Many of the icons you'll know from word processing or other online programs, but some may be unfamiliar.
The link icon allows you to link text to an external website or an uploaded file so for instance if we select the text United Nations and then click the link a pop-up appears allowing us to paste in a URL or web address.
The text will change colour but note that the link will only work once you've saved the changes.
The media icon here offers many options for adding sound and video along with thumbnail images and subtitles: we explore adding media in a later video.
These icons allow you to directly record sound and video from within the editor.
H5P is free software for creating interactive content such as quizzes. The H5P icon allows you to either link to or upload an existing H5P file.
The Atto editor allows you to drag and drop images directly onto the text box - and it automatically saves what you type so if you have to leave it for a while or you accidentally go onto a different page or lose your connection, you don't have to start again.
We also have an accessibility checker and a screen reader helper. They help ensure your text is designed well to make it accessible for everyone on all devices including people with restricted sight who use screen readers.
You can change your editor, if your admin allows, by going to the user menu top right, clicking on Preferences then Editor preferences.
Technical people might choose plain text if they want to add code and Tiny MCE is a modern editor which is popular in many organisations and which you are welcome to use.